STRIVER- How do I populate the account with staff and pupil details from my MIS? (Wonde and GC)
![]() Updated
by
Matt Besant
Updated
by
Matt Besant
Whether you are a new customer looking to populate your account for the first time, or an existing user looking to update with new staff and pupils. Then the easiest way to do this is via the MIS sync wizard.
We have partnered with Groupcall and Wonde, integration and GDPR experts whose service allows you to update Striver accounts in just a few clicks. Not only is this the quickest way of populating details on Striver, it negates the need for CSV files and therefore safer and GDPR compliant.
This service comes at no extra cost to you so to set up, please follow the instructions below:
Setting up Groupcall's Xporter on Demand
This only needs to be done once but we cannot run the MIS sync wizard without first setting up Groupcall's Xporter on Demand and authorising the relevant data to be shared with Striver.
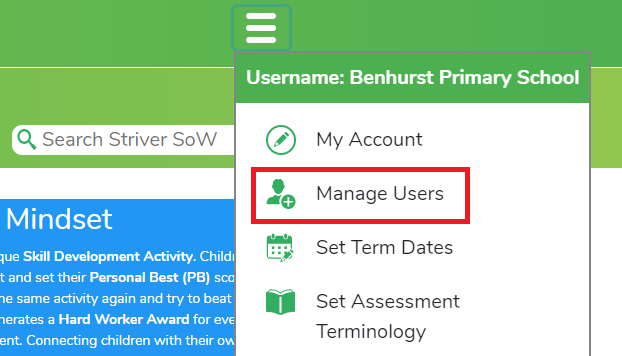
- Log into Striver and head to Manage Users.
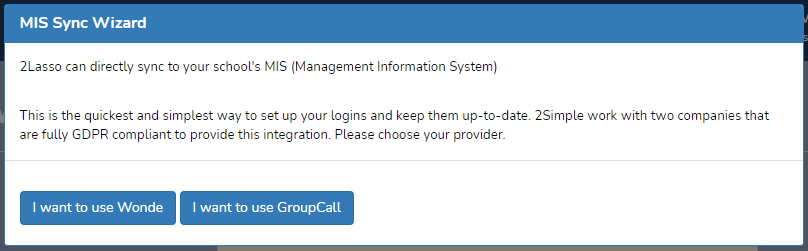
- Once in 2Lasso, you will see a "tools" option at the top. If you select tools and then select "MIS sync wizard" you will see this pop-out. Where you will be asked to choose either Wonde or Groupcall.
- Select I want to use Groupcall
- You will then see this pop-out. Where you will be asked to choose which data areas from the MIS you wish for Striver to see. which data areas from the MIS you wish for Striver to see. Read this information carefully and you can also see more details about what data Striver requires here: What MIS data does 2Simple require?
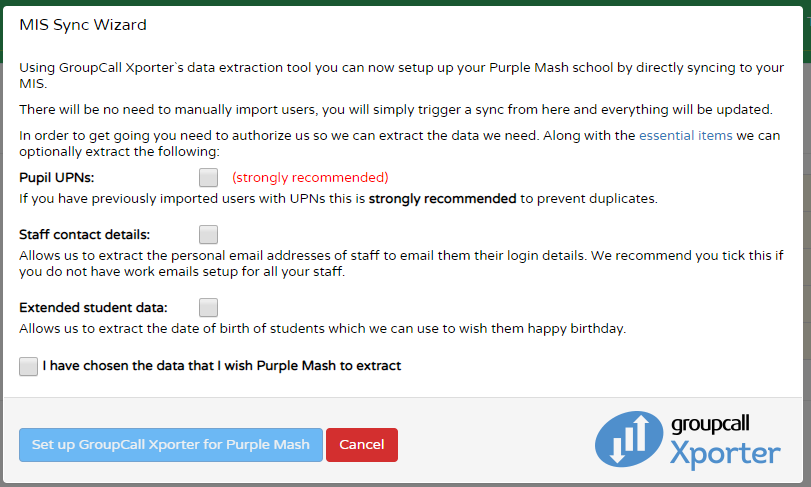
- Confirm you have chosen the data you wish Striver to extract and click "Set up Groupcall Xporter for Striver". This will generate an email to you from Groupcall asking you to consent the data share. Follow the instructions on this email carefully and be sure to enter the details of the person with authority to share data if this is not you. You can find a useful video to talk you through this here: How do I authorise the data share with my MIS?
- Once authorised and installed, you're now ready for the MIS sync wizard and won't have to repeat any of the above steps again!
Setting up Wonde
- Log into Striver and head to Manage Users.
- Once in 2Lasso, you will see a "tools" option at the top. If you select tools and then select "MIS sync wizard" you will see this pop-out. Where you will be asked to choose either Wonde or Groupcall.
- Select I want to use Wonde - this will open the following screen
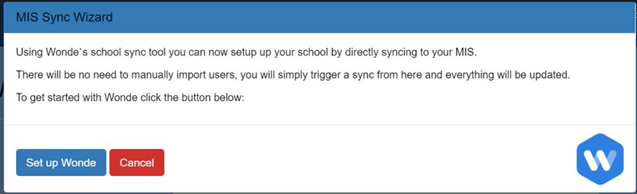
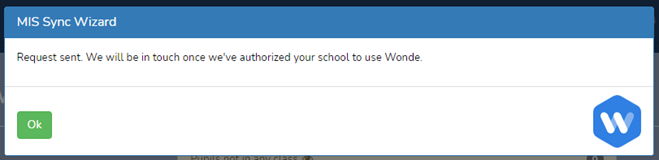
- Select ‘Set up Wonde’ this will then present you with a message informing you that the request has been sent. The 2Simple Support team will then be in touch to get you set up.
- You will then receive an email from the 2Simple support team informing you that you have been invited to use Wonde. The Wonde support team will be in touch to either arrange an install onto your school's servers or If you are already using Wonde with another app in your school you will just have to authorise the sharing of data. You will then be able to go straight back to Striver and run the MIS sync wizard - steps here: STRIVER - MIS Sync Wizard Instructions